Information For Timers
Introduction to Timing
The timer's job is to set the timing of spoken text. This is the most boring part of the process but it is also one of the most important parts of the subbing process. You listen to the audio, determine where dialog starts and ends, and set times accordingly. Aegisub makes it very simple to time scripts, but other programs such as Medusa or Substation Alpha 4 are also decent programs for timing. Aegisub has a fairly advanced, customizable audio mode with both the traditional waveform display as well as an alternative spectrum display. Several different timing modes are available for both normal dialog timing and karaoke timing. #PocketMonsters now uses the latest version of Aegisub for pre-timing all scripts and also makes sure all dialog is scene timed, where appropriate. Also be sure to use Japanese closed captions whenever possible for our subs.Opening Audio
To load an audio file into Aegisub, just go to the Audio menu and press Open audio file. If you have a video file already loaded, you can use Open audio from video instead, which obviously will load the audio track from the video file you currently have loaded. You can open any type of audio file that your DirectShow environment knows how to decode. For example, if you want to load an AC3 file, you will need an AC3 DirectShow decoder (e.g. AC3filter or ffdshow).When loaded, the audio is downmixed to mono (see the section on audio downmixer in the options documentation if you want to grab one channel only), decompressed to PCM (a.k.a. WAV), and (by default) loaded into a RAM cache. This means that you will need a large amount of RAM to open a long audio file. If your computer doesn't have a lot of RAM, or if you're working with a full-length movie, refer to the audio cache option in the options documentation for instructions on how to make Aegisub use its (slower) hard drive cache instead.
Since most of our releases use AAC or AC3, #PocketMonsters staff members should convert their audio to WAV before beginning any timing assignment but with current versions of Aegisub, it may not be necessary and just opening the audio from the video raw should be enough to load the waveform for timing.
Audio caching
If you're loading any audio format that isn't an uncompressed (PCM) Microsoft WAV file, Aegisub needs to decode and cache it first. When loaded, the audio is downmixed to mono audio downmixer option if you want to grab one channel only instead), decompressed to PCM (a.k.a. WAV), and (by default) loaded into a RAM cache. This means that you will need a large amount of RAM to open a long compressed audio file. If your computer doesn't have a lot of RAM, or if you're working with a full-length movie, refer to the audio cache option for instructions on how to make Aegisub use its (slower) hard drive cache instead; or decompress the file to WAV first since Aegisub can read from WAV's directly without need for caching.The exact amount of memory used for any given audio file can be calculated with the following formula:
s = ( b * r * l ) / 8
where s is the amount of memory (in bytes - divide by 1024 to get kB), b is the number of bits per sample (always 16 in the current implementation), r is the sample rate in Hz (usually 48000, or 44100 in some cases), and l is the length of the audio (in seconds).
For example, for a 25 minute audio clip at 48 kHz, you will need (16 * 48000 * 25 * 60)/8 = 144000000 bytes ~= 137 MB.
Loading and decompressing the audio into the cache will take a few seconds; Aegisub will display a progress indicator while loading the audio.
Loading and decompressing the audio into the cache takes a little while. When it is done, Aegisub will transform into something like the picture below:
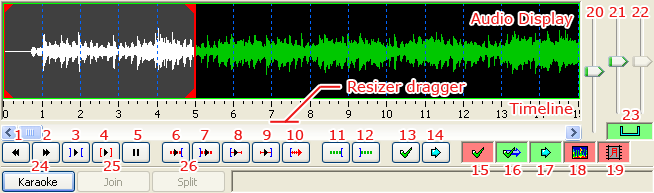
You can click and drag just below the audio timeline to change the height of the audio waveform/spectrum display.
Green and red buttons are toggle buttons. A green background indicates that the option is turned on, while a red background indicates that the option is turned off. The buttons and controls are as follows (many of these have keyboard shortcuts associated with them by default):
The buttons are as follows:
1. Go to previous line, discarding any unsaved changes (previous syllable when in karaoke mode)
2. Go to next line, discarding any unsaved changes (next syllable when in karaoke mode)
3. Play selected area of the audio waveform
4. Play currently selected line
5. Pause playback
6. Play 500ms before selection start
7. Play 500ms after selection end
8. Play first 500ms of selection
9. Play last 500ms of selection
10. Play from selection start to end of file (or until pause is pressed)
11. Add lead-in (how much is determined by the audio lead in setting)
12. Add lead-out (exactly like the above, but the setting is called audio lead out, logically enough)
13. Commit (save) changes
14. Scroll view to selection/go to selection
15. Toggle auto-commit (all timing changes will be committed immediately, without the user pressing commit, if this is enabled)
16. Toggle auto next line on commit (if this is enabled, Aegisub will automatically select the next line when the current line is committed; enabling both this and auto-commit at the same time is strongly discouraged)
17. Toggle auto-scrolling (will center waveform on the currently selected line automatically when enabled)
18. Toggle spectrum analyzer mode (see below)
19. Toggle Medusa-style timing shortcuts
20. Audio display zoom (horizontal)
21. Audio display zoom (vertical)
22. Audio volume
23. Toggle linking of vertical audio zoom slider with volume slider
24. Toggle karaoke mode
25. Join selected syllables (karaoke mode only)
26. Split selected syllables (karaoke mode only)
Timing Audio
If you are starting a script from scratch (usually pretiming), open the audio and/or video. Select the first line of the script and in the audio wav form area, pick the beginning and the ending point of that line. Commit the changes and a new line will appear. Repeat this process until the entire script is completely timed.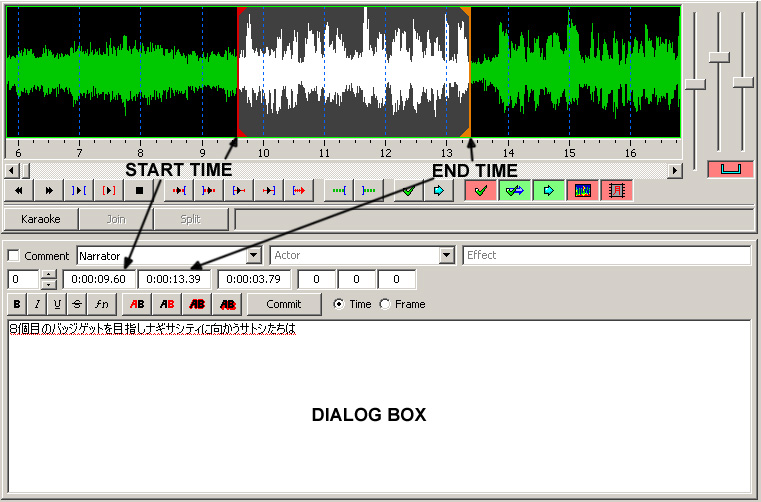
When you click on a line, Aegisub will highlight it, and, if you have the Auto button checked, center the audio display on it. Now, you can drag around the boundaries of the selection (red lines) to change the start and end times of the line. The dark blue lines are second boundaries. The selection will become red and show the word Modified in red on the audio display until you either press the Commit button (or press Enter, which also will take you to the next line) to save the changes. Press the Play selection button to listen to the selected area, or the other play buttons to listen to other areas around the selected area. When you are satisfied with the timing, press Commit or hit Enter. Normal audio timing is as easy as that, it's just a lot of work and takes a lot of time, no pun intended. Sometimes you many have the translated lines before hand and you can put those in the Dialog box if you have them, otherwise #Pocketmonsters generally pretimes all the dialog lines and leaves them blank for the translation to fill in.
Karaoke Timing
Enter the harder part of audio timing: karaoke. Aegisub's karaoke mode is quite similar to, but not the same as, Medusa's equivalent, so if you are familiar with that, Aegisub should give you little trouble with karaoke.When you have timed each line to match the lines of the song, enter the karaoke mode by pressing the Karaoke button. This will reward you with Aegisub changing the audio view to something like the picture below:
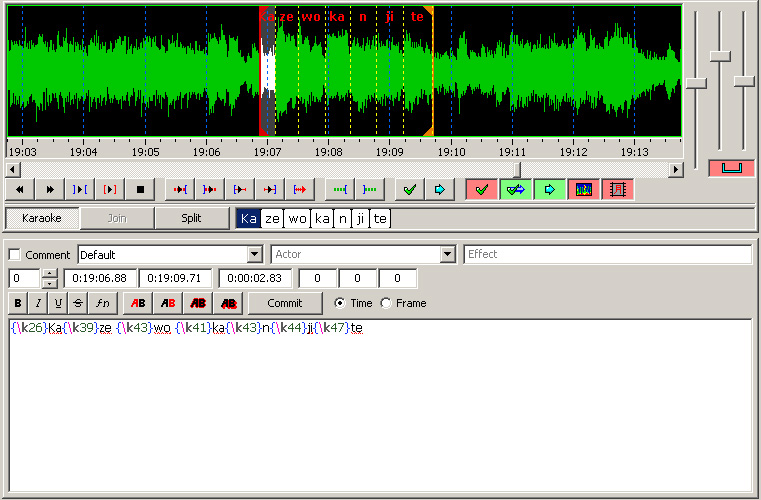
The first part of karaoke timing is timing the words to match the words of the song. Here, the karaoke mode works just like the normal timing mode with one exception: you can click on a word (or later on, a syllable) to highlight it and then use the numpad + and - buttons to make fine-grained adjustments (just make sure numlock is on). Also note that the play buttons have changed slightly - next/previous line is now next/previous syllable, and most of the other buttons now work on syllables instead of on lines. Also note that the next/previous syllable buttons can take you from one line to the next if you go past/before the last/first syllable in a line - Aegisub will, however, warn you that you're about to lose all changes to the current line if you do.
Remember that if you want to shift the beginning or end of the line, you have to exit the karaoke mode to do so. Remember to press Commit before you exit the karaoke mode, or you will lose all the changes you just worked on!
When you have finished timing the words, it's time to split the words into syllables. Select the word you want to split and click the split button. This will give you this dialog box:

Enter a pipe character ("|") between each syllable, as shown above, and press OK to split the word into syllables. To insert an empty syllable (useful for non-vocal parts between words or syllables) between two others, type two pipes ("||") instead of one as a separator. Sometimes, it can be a good idea to enter a pipe between the last character in the word and the following space (as the example above shows) - this depends on what kind of karaoke effect you are planning to do, and if there's a pause between one word and the next. If you are not the person who is going to do the effect, ask the responsible person about how they would like it.
When you have the syllables split, time them in the now (hopefully) familiar way. If you want to insert an extra empty syllable, highlight a syllable before or after the empty one, press Split and type a pipe before or after the syllable, depending on where you want the empty syllable. When you feel satisfied with the line, remember to press Commit! The karaoke override tags won't be written until you do.
These are the basic 2 types of timing: script and karaoke. It's not that difficult to master and all staff members should be familiar with the basics of timing.
Scene timing:
Scene timing requires a bit more skill then the standard audio waveform start and end time marking as it also takes into account scene changes in the video. Exact frames for the beginning of a scene when dialog starts or right before a scene change occurs at the end of someone talking must be taken into consideration when scene timing a line.Scene timing tends to have a much more aesthetic look to the subtitle lines than to those that end a few frames after a scene change or even a few frames before it. The difficult part of mastering Scene timing is determining what to do with a line that has audio that goes a few frames or milliseconds past a scene change. In many cases, with Pocket Monsters episodes this occurs often because the dialog isn't scene timed and overlaps 3-4 frames on many lines. Generally when scene timing an episode of Pocket Monsters, those 3-4 frames only represent a few milliseconds and aren't noticeable when cropping the line timing early to accommodate a scene change.
When timing, you have to decide whether to cut the line off slightly early to match a scene change frame or extend it a bit so it goes a bit past the scene change while incorporating the entire audio for that particular line. Aegisub allows timers to quickly scene time. A blue vertical line will appear in the audio waveform for major keyframes. This generally corresponds with scene changes, although its always good to double check. While hovering over the blue vertical keyframe, timers can lock the times to that frame when the vertical bar turns yellow. This can be done for the start or end times for a line and is a fast way to scene time.
This page has been viewed 453 times.
Last updated 01 Nov 2018 19:07
by Sunain.
Revision #20
Revision #20
Page Tags: